How To: Install CS-Cart on a Server with Nginx and *nix OS
Note
Tutorial Difficulty: 3 / 3
Technical skills required.
In this tutorial, you will learn how to install CS-Cart on a virtual private or dedicated server that runs a *nix operating system and nginx.
Note
We assume that you have registered a domain and linked it to a directory on your server. You will also need nginx, PHP-FPM, MySQL, and phpMyAdmin to create a database.
Step 1. Configure Nginx
1.1. Connect to the your server via SSH.
Windows users have to download and install PuTTY or any other SSH client. See this guide if you want to learn about PuTTY.
If you use a *nix OS (for example, Linux, FreeBSD, Ubuntu, OS X, etc.), type the following command in the Terminal and press Enter. Don’t forget to replace username and host with your login details. If you don’t know your username and host, contact your hosting provider or server administrator.
ssh username@host
Then you will be asked to enter your password. Type it and press Enter.

Note
Your cursor won’t move and you won’t see any changes while you type your password. That is normal.
1.2. Stop nginx using this command:
sudo service nginx stop
We will configure nginx while it is offline.
1.3. Find out the number of processors in the system. Use this command:
cat /proc/cpuinfo | grep processor | wc -l
You will see a number you’ll need for Step 1.4. In the picture we marked the number in red.

1.4. On your server find the file /etc/nginx/nginx.conf and open it in a text/code editor of your choice.
| Find this line: | worker_processes 4; |
| Change the number (see Step 1.3): | worker_processes 2; |
Important
We’ll be using example.com in many of the commands and configuration files below. Please replace example.com with your domain name.
1.5. Create a directory for your store. For your convenience we recommend using your domain name for your directory. In this tutorial we create a new folder called example.com with this command:
mkdir -p /var/www/html/example.com
1.6. Open the /etc/nginx/sites-available/default file. Delete its content and copy the following code to the file. Make sure to find and replace all instances of example.com with your actual folder name.
#######################################################################
# Description and configuration of the primary domain for the store.
#######################################################################

server {
    listen  80;
    #   The store’s domain
    server_name example.com;

    ############################################################################

    #   Default encoding
    charset utf-8;

    ############################################################################

    #   The main directory of your store
    root /var/www/html/example.com;
    index  index.php index.html index.htm;

    ############################################################################

    #   Compression
    gzip on;
    gzip_disable "msie6";
    gzip_comp_level 6;
    gzip_min_length  1100;
    gzip_buffers 16 8k;
    gzip_proxied any;
    gzip_types text/plain application/xml
    application/javascript
    text/css
    text/js
    text/xml
    application/x-javascript
    text/javascript
    application/json
    application/xml+rss;

    ############################################################################

    #   Other settings
    client_max_body_size            100m;
    client_body_buffer_size         128k;
    client_header_timeout           3m;
    client_body_timeout             3m;
    send_timeout                    3m;
    client_header_buffer_size       1k;
    large_client_header_buffers     4 16k;

    ############################################################################

    access_log  /var/log/nginx/example.com_access.log combined;
    error_log   /var/log/nginx/example.com_error.log;

    ############################################################################

    error_page 598 = @backend;

    ############################################################################

    location @backend {
        try_files $uri $uri/ /$2$3 /$3 /index.php  =404;
        #   The path to the PHP-FPM daemon socket
        fastcgi_pass unix:/var/run/php5-fpm.sock;
        #
        fastcgi_index index.php;
        fastcgi_read_timeout 360;
        # Including the contents of fastcgi_params.conf
        ################################################################################
        fastcgi_param  QUERY_STRING       $query_string;
        fastcgi_param  REQUEST_METHOD     $request_method;
        fastcgi_param  CONTENT_TYPE       $content_type;
        fastcgi_param  CONTENT_LENGTH     $content_length;
        fastcgi_param  SCRIPT_NAME        $fastcgi_script_name;
        fastcgi_param  REQUEST_URI        $request_uri;
        fastcgi_param  DOCUMENT_URI       $document_uri;
        fastcgi_param  DOCUMENT_ROOT      $document_root;
        fastcgi_param  SERVER_PROTOCOL    $server_protocol;
        fastcgi_param  HTTPS              $https if_not_empty;
        fastcgi_param  GATEWAY_INTERFACE  CGI/1.1;
        fastcgi_param  SERVER_SOFTWARE    nginx/$nginx_version;
        fastcgi_param  REMOTE_ADDR        $remote_addr;
        fastcgi_param  REMOTE_PORT        $remote_port;
        fastcgi_param  SERVER_ADDR        $server_addr;
        fastcgi_param  SERVER_PORT        $server_port;
        fastcgi_param  SERVER_NAME        $server_name;
        fastcgi_param  SCRIPT_FILENAME    $document_root$fastcgi_script_name;
        fastcgi_param  REDIRECT_STATUS    200;
        ################################################################################
    }

    ############################################################################

    location  / {
        index  index.php index.html index.htm;
        try_files $uri $uri/ /index.php?$args;
    }

    ############################################################################

    location ~ ^/(\w+/)?(\w+/)?api/ {
        rewrite ^/(\w+/)?(\w+/)?api/(.*)$ /api.php?_d=$3&ajax_custom=1&$args last;
        rewrite_log off;
    }

    ############################################################################

    location ~ ^/(\w+/)?(\w+/)?var/database/ {
        return 404;
    }

    location ~ ^/(\w+/)?(\w+/)?var/backups/ {
        return 404;
    }

    location ~ ^/(\w+/)?(\w+/)?var/restore/ {
        return 404;
    }

    location ~ ^/(\w+/)?(\w+/)?var/themes_repository/ {
        allow all;
        location ~* \.(tpl|php.?)$ {
            return 404;
        }
    }

    location ~ ^/(\w+/)?(\w+/)?var/ {
        return 404;
        location ~* /(\w+/)?(\w+/)?(.+\.(js|css|png|jpe?g|gz|yml|xml|svg))$ {
            try_files $uri $uri/ /$2$3 /$3 /index.php?$args;
            allow all;
            access_log off;
            expires 1M;
            add_header Cache-Control public;
            add_header Access-Control-Allow-Origin *;
        }
    }

    ############################################################################

    location ~ ^/(\w+/)?(\w+/)?app/payments/ {
        return 404;
        location ~ \.php$ {
            return 598;
        }
    }

    location ~ ^/(\w+/)?(\w+/)?app/addons/rus_exim_1c/ {
        return 404;
        location ~ \.php$ {
            return 598;
        }
    }

    location ~ ^/(\w+/)?(\w+/)?app/ {
        return 404;
    }

    ############################################################################

    location ~ ^/(favicon|apple-touch-icon|homescreen-|firefox-icon-|coast-icon-|mstile-).*\.(png|ico)$  {
        access_log off;
        try_files $uri =404;
        expires max;
        add_header Access-Control-Allow-Origin *;
        add_header Cache-Control public;
    }

    location ~* /(\w+/)?(\w+/)?(.+\.(jpe?g|jpg|webp|ico|gif|png|css|js|pdf|txt|tar|woff|woff2|svg|ttf|eot|csv|zip|xml|yml))$ {
        access_log off;
        try_files $uri $uri/ /$2$3 /$3 /index.php?$args;
        expires max;
        add_header Access-Control-Allow-Origin *;
        add_header Cache-Control public;
    }

    ############################################################################

    location ~ ^/(\w+/)?(\w+/)?design/ {
        allow all;
        location ~* \.(tpl|php.?)$ {
            return 404;
        }
    }

    ############################################################################

    location ~ ^/(\w+/)?(\w+/)?images/ {
        allow all;
        location ~* \.(php.?)$ {
            return 404;
        }
    }

    ############################################################################

    location ~ ^/(\w+/)?(\w+/)?js/ {
        allow all;
        location ~* \.(php.?)$ {
            return 404;
        }
    }

    ############################################################################

    location ~ ^/(\w+/)?(\w+/)?init.php {
        return 404;
    }

    location ~* \.(tpl.?)$ {
        return 404;
    }

    location ~ /\.(ht|git) {
        return 404;
    }

    location ~* \.php$ {
        return 598 ;
    }

    ################################################################################

}
1.7. Use this command to restart nginx:
sudo service nginx restart
1.8. Make sure you install PHP-FPM. If you don’t have it, nginx may give you Error 502, when you try to view your site. Use this command:
sudo apt-get install php5-fpm php5-mysql php5-curl php5-gd php-mail -y
You can install and use any version of PHP that meets the system requirements. But in that case you’ll also need to adjust nginx configuration (/etc/nginx/sites-available/default) accordingly. For example, if you install PHP7-FPM, you’ll need to change the path to the PHP-FPM daemon socket to /var/run/php/php7.0-fpm.sock.
1.9. Let’s configure nginx for phpMyAdmin. We want it to open when we go to pma.example.com. Open the file /etc/nginx/sites-available/default and add the following code to the end of the file. Again, replace all instances of example.com with your actual folder name.
#######################################################################
# pma.example.com
#######################################################################

server {
    listen  80;

    #   A subdomain for phpMyAdmin
    server_name pma.example.com www.pma.example.com;

    charset utf-8;

    #   The location of the log files
    access_log  /var/log/nginx/pma.example.com_access.log combined;
    error_log   /var/log/nginx/pma.example.com_error.log;

    #   The path for the subdomain to refer to
    root /usr/share/phpmyadmin;
    index index.php index.html index.htm;

    location / {
        try_files $uri $uri/ =404;
    }

    location ~ \.php$ {
        root /usr/share/phpmyadmin;
        proxy_read_timeout 61;
        fastcgi_read_timeout 61;
        try_files $uri $uri/ =404;
        #   The path to the PHP-FPM daemon socket
        fastcgi_pass unix:/var/run/php5-fpm.sock;
        fastcgi_index index.php;
        fastcgi_param SCRIPT_FILENAME $document_root$fastcgi_script_name;
        include fastcgi_params;
    }
}
1.10. Restart nginx once more:
sudo service nginx restart
Step 2. Upload CS-Cart
2.1. Download the latest version of CS-Cart or Multi-Vendor.
2.2. Upload the cscart_vx.x.x.zip or Multi-Vendor archive you downloaded to the directory you created in Step 1.5 (/var/www/html/example.com in the example).
To do that, connect to the server with your FTP client. You’ll need the name of the host, username, password and, in some cases, port. Contact your hosting provider or the server administrator for your FTP account details.
2.3. In the Terminal/SSH Client switch to the directory of your site. Use this command, and replace example.com with the name of the directory you created in Step 1.5:
cd /var/www/html/example.com
Your command may look different if your document root is different.

2.3. Use the following command to see what’s inside the directory:
ls
You should see the archive you uploaded, and any other files or directories you may have in your Document Root.
2.4. Unpack the archive:
unzip cscart_vx.x.x.zip
In the example we have cscart_v4.3.4.zip. The name of your archive depends on the version of CS-Cart/Multi-Vendor that you install.
Step 3. Change Ownership and Permissions
Important
Some commands in this step may require root (superuser) privileges. If a command doesn’t work, try adding the sudo prefix before it. Learn more about sudo at Linux Academy Blog.
3.1. Execute the following commands one by one:
chmod 644 config.local.php
chmod -R 755 design images var
find design -type f -print0 | xargs -0 chmod 644
find images -type f -print0 | xargs -0 chmod 644
find var -type f -print0 | xargs -0 chmod 644
These commands set the right permissions for the files, so that CS-Cart can install properly. The 3 digits represent the rights of the owner of the file/directory, the owner’s group, and other users respectively.
For example, chmod 644 config.local.php means that:
- The owner of config.local.php can read the file and write to it (6).
- The group to which the owner belongs (e.g., administrators) can read the file (4).
- All other users can also read the file (4).
Note
There are three types of things a user can do with a file: read, write and execute. The easy way to remember the numbers for the chmod command is this:
read = 4
write = 2
execute = 1
A sum of the numbers represents a user’s set of rights, for example read + write = 4 + 2 = 6
The types of rights for directories are the same. Read allows to get the list of the files and subdirectories; write allows to create, rename and delete files in the directory; execute allows to enter the directory and access files and directories inside.
3.2. Set the Nginx user as the owner of your CS-Cart files. For example, on Ubuntu the default Nginx user is usually www-data, and its group is www-data as well. In this case, this is the command you need to use:
chown -R www-data:www-data .
Warning
Before running chown, please use the ls command to double-check that you’re it the Document Root. When you run chown as described above, all the files and folders you see, as well as and their subfolders and files, will be given to the specified user.
Step 4. Create a Database
4.1. Open phpMyAdmin in your browser. In our case the link to it is located in the Document Root and is accessible by http://pma.example.com. Contact your hosting provider or server administrator for phpMyAdmin login and password.
If you open it for the first time, the credentials may be as follows:
| Login | root |
| Password | The MySQL password; it is also the password you enter during the installation of phpMyAdmin. The default password may be mysql, root, password, or empty field. |
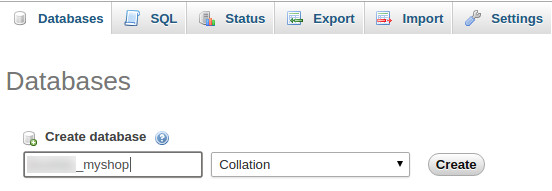
4.2. Switch to the Databases tab.
4.3. Enter the name of your database.
4.4. Press Create.
Step 5. Install CS-Cart
5.1. Open your store’s URL in a browser. You’ll see a message that CS-Cart is not installed. Let’s fix this by clicking the [install] link.

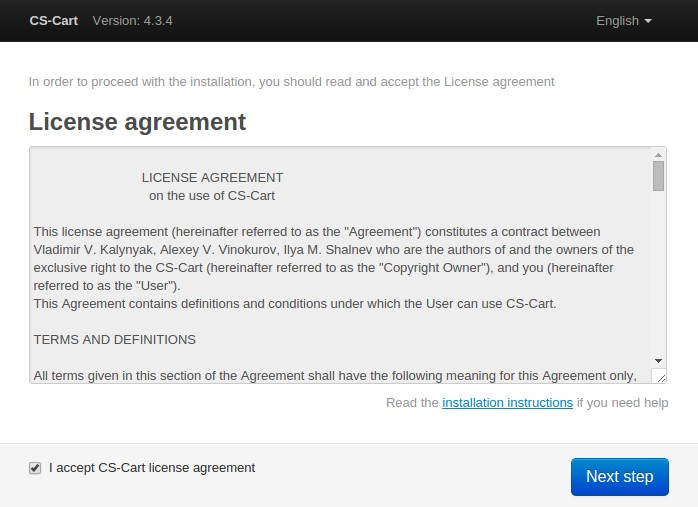
5.2. Read and accept the License Agreement in order to proceed.
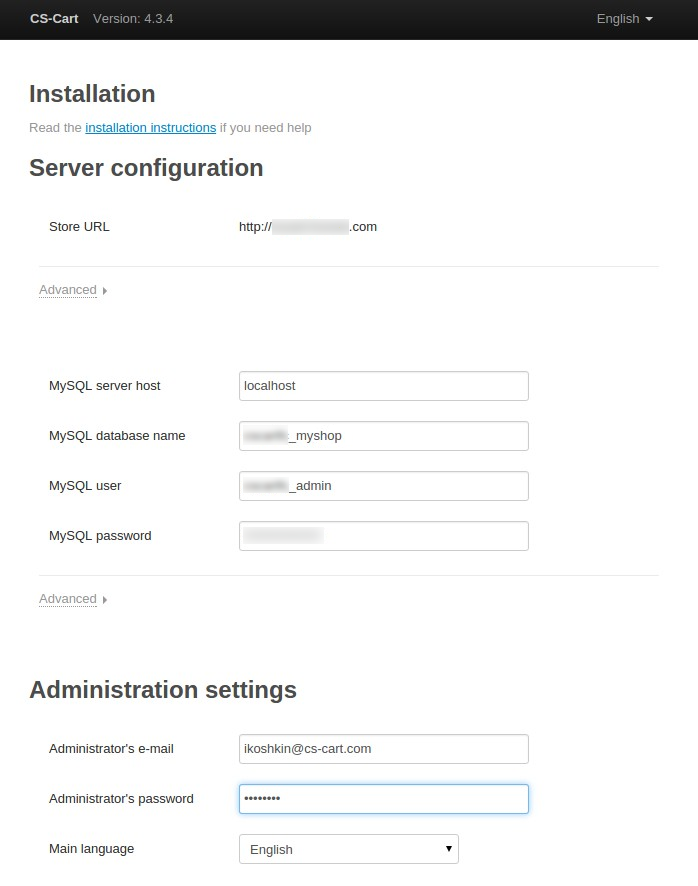
5.3. Fill in the form using the details below:
| MySQL Server Host | Enter the DNS name or IP address of your MySQL server. Usually it’s localhost (because the database and the website are stored on the same server). |
| MySQL Database Name | Enter the name of the database you created in Step 4.4. |
| MySQL User | Enter the username from Step 4.1. |
| MySQL Password | Enter the password of the MySQL user. |
| Administrator’s Email | Enter your email here. CS-Cart will use it to notify you about new orders, call requests, and other important events in your store. |
| Administrator’s Password | Enter the password you will use to access the CS-Cart administration panel. |
| Main Language | English (or any language of your choice). |
Note
Additional languages are available under the Advanced tab of Administration settings. You can enable or disable them now or later.
5.4. If this is your first time with CS-Cart and you want to see what your store will look like once you add the details about your products, fill your store with demo products, orders, and banners.
To do that, tick the Install demo data checkbox. You can always remove demo data later. We’d appreciate it if you helped us make CS-Cart better. Tick the Help us improve CS-Cart checkbox to send anonymous usage statistics.
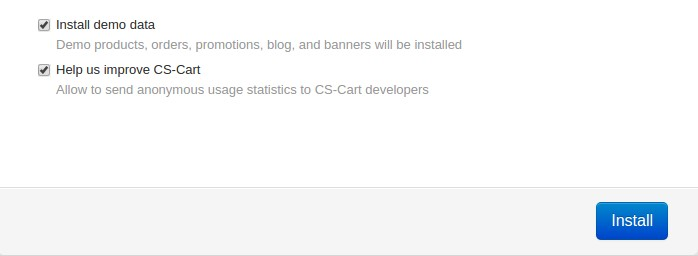
5.5. After you press Install you’ll see the progress bar running. Please, don’t close the page during the installation. This is when CS-Cart settles in on your server and unpacks various themes and add-ons. Don’t worry, it won’t be long before your new store is good to go!

Step 6. Choose Your Licensing Mode
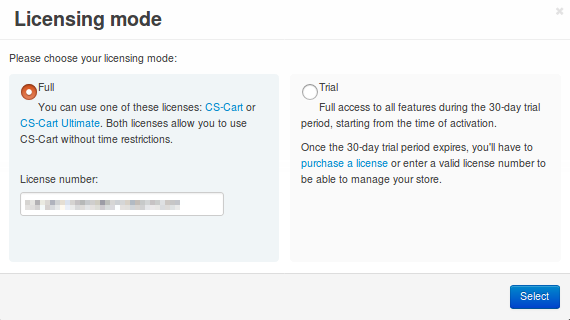
The next step is to choose your licensing mode. You have 2 options:
Enter your license number to enable the Full mode, that gives you unrestricted access to all CS-Cart features, i.e. several dozens of add-ons, multiple languages and currencies, unlimited number of product filters on the storefront, and more. You can purchase a license any time.
Note
You can enter your CS-Cart or CS-Cart Ultimate license number in this field.
If you don’t have a license yet, we offer a free 30-day trial with full access to all CS-Cart features. After the end of your trial period you’ll need to enter your license number to continue managing your store.
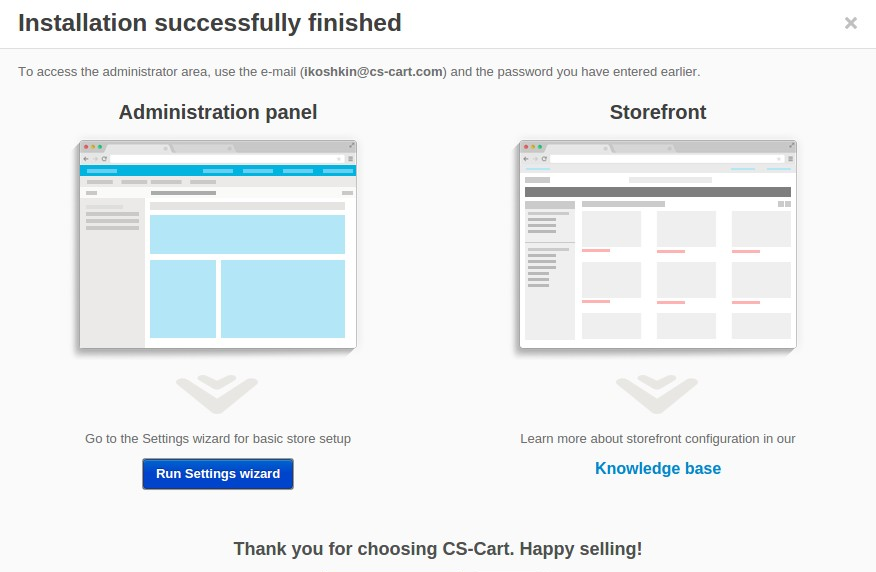
Once you choose your licensing mode, your online store is all set! Now you can go to the Storefront to view your store, or to the Administration panel to manage it.
Questions & Feedback
Have any questions that weren't answered here? Need help with solving a problem in your online store? Want to report a bug in our software? Find out how to contact us.