How To: Set Up Stripe Connect in Multi-Vendor
Note
The Stripe Connect Payments add-on is available only in Multi-Vendor.
Stripe Connect allows marketplace owners to offer credit card payments via Stripe and automatically distribute funds from orders between vendors.
Step 1. Configure the Payment Method
Go to Settings → Payment methods and click the + Add payment method button in the top right corner to add a payment method.
A new pop-up window with the payment method creation form will open. Fill in the fields on the General tab:
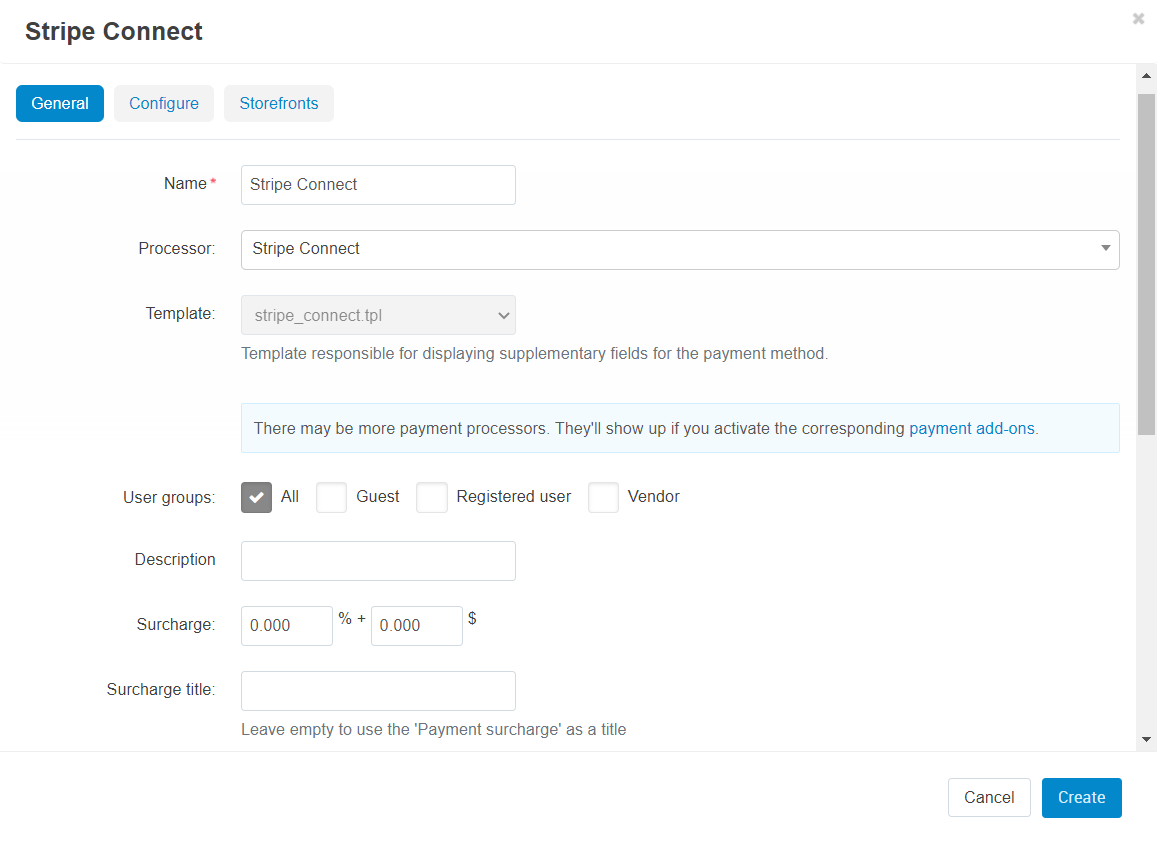
- Processor—the online payment processor that will handle the transactions. Choose Stripe Connect from the drop-down menu.
- Name—the name of the new payment method. This name will be displayed to customers at checkout.
- If necessary, specify values for the other fields.
Learn more about other settings in this article.
Switch to the Configure tab. It contains the settings specific to Stripe Connect:

Client ID—the live client ID of your Stripe account.
Publishable key—the publishable API key of your Stripe account.
Private API key—the secret API key of your Stripe account. You can use:
- a full access secret key (
sk_...); it grants full access to all permissions at once. However, this approach is less secure: if the key is compromised, an attacker may gain unrestricted access to the entire account. - a restricted key with limited permissions, recommended by Stripe (
rk_...); it allows you to limit API permissions and reduce security risks. We recommend switching to a restricted key with only the required permissions for your store. If you use a restricted key, give it Write permission for the following sections:- Checkout
- Webhook
- Connect
- a full access secret key (
Redirect URIs—the values that you must copy to the corresponding fields on the Stripe dashboard.
Note
Learn more about how to get client ID and API keys for Stripe Connect and how to use Redirect URIs in a separate article.
Currency—select the currency of your Stripe account. It should match the primary currency of your store to ensure more accurate calculations.
Enable 3-D Secure—the setting determines whether funds are first transferred to the marketplace owner instead of going straight to vendors:
- When 3-D Secure is disabled, funds will go straight to the connected Stripe accounts of vendors. Commissions and payouts will be taken from vendors as application fees.
- When 3-D Secure is enabled, funds will first go to the marketplace owner’s Stripe account. Then they will be automatically distributed between the connected Stripe accounts via transfers. Transfers require that the marketplace owner and vendors have their accounts in the same region: either all in Europe, or all in the U.S. If a vendor’s account is in a different region from the marketplace owner’s, the funds will not be transferred to that vendor automatically.
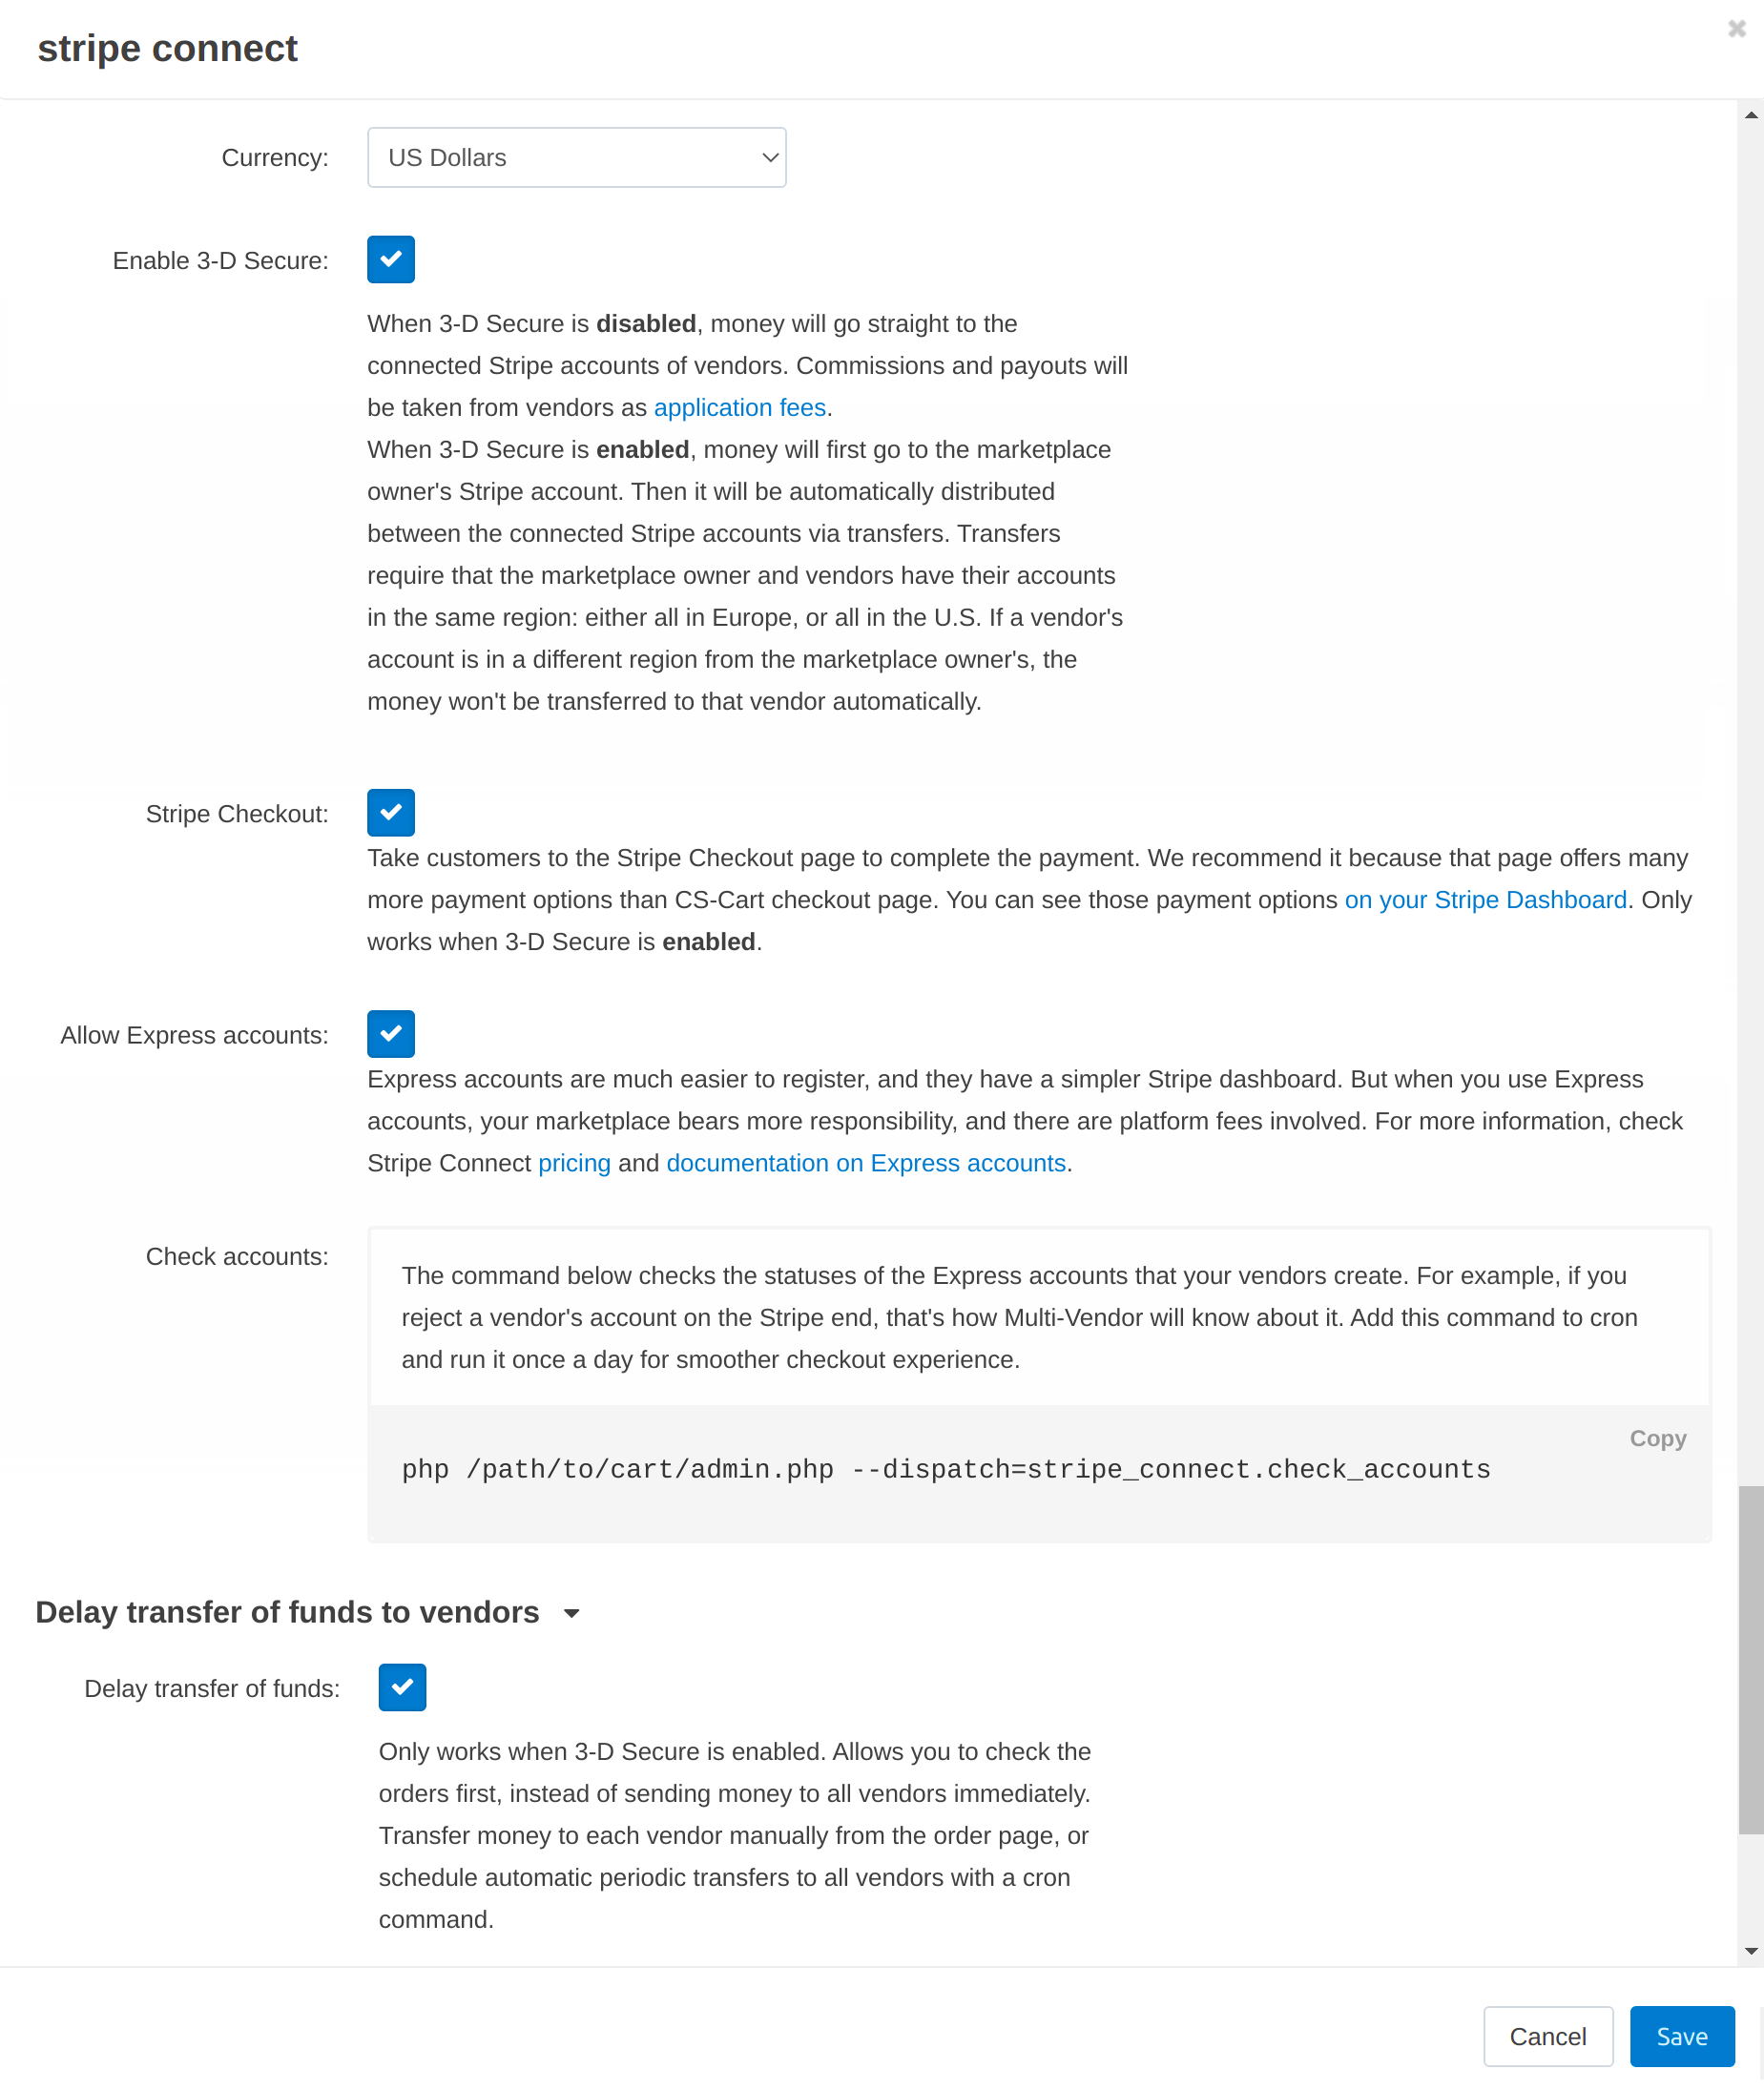
Stripe Checkout—the setting activates a separate page with a variety of payment options for your customers to choose from during checkout.
- more than 20 local and familiar payment systems like Apple and Google Pay, Sofort and Klarna, WeChat and Alipay, Przelewy24 and Afterpay, and many more;
- payment for the order in installments thanks to Klarna and Afterpay;
- a sense of security among customers about the safety of their personal and financial information when using familiar payment systems;
Be sure to enable 3-D Secure so that you can activate the Stripe Checkout.
Allow Express accounts—the setting allows vendors to register Stripe Express accounts. Express accounts support faster registration and a simpler Stripe dashboard. But when you use Express accounts, your marketplace bears more responsibility, and additional platform fees may apply.
To check the statuses of the Express accounts that your vendors create, add a special command to cron.
php /path/to/cart/admin.php --dispatch=stripe_connect.check_accounts
Delay transfer of funds—delay transfers to vendors. Configure manual or automatic disbursements to vendors. The setting works only if 3-D Secure is enabled.
To schedule automatic periodic disbursements, add a special command to cron. Set the desired value of the “–days” parameter. Funds will be transferred automatically for orders older than the specified number of days.
php /path/to/cart/admin.php --dispatch=stripe_connect.transfer_funds_by_cron --payment_id=14 --days=14To transfer funds to the vendor for the current order manually, click the Transfer funds to vendors button on the order page. After clicking this button, the note will inform you if Funds have been transferred successfully or not.
Once you have configured the payment method, click Create.
Step 2. Have Your Vendors Connect Their Accounts
Once you set up a Stripe Connect payment method, vendors will be able to connect their accounts and use that payment method. The payment method will be offered to customers only if all the vendors in the order have connected their accounts.
Important
The Connect with Stripe button will appear only to vendor administrators or those marketplace administrators logged in as vendors.
Follow these steps to connect a vendor account:
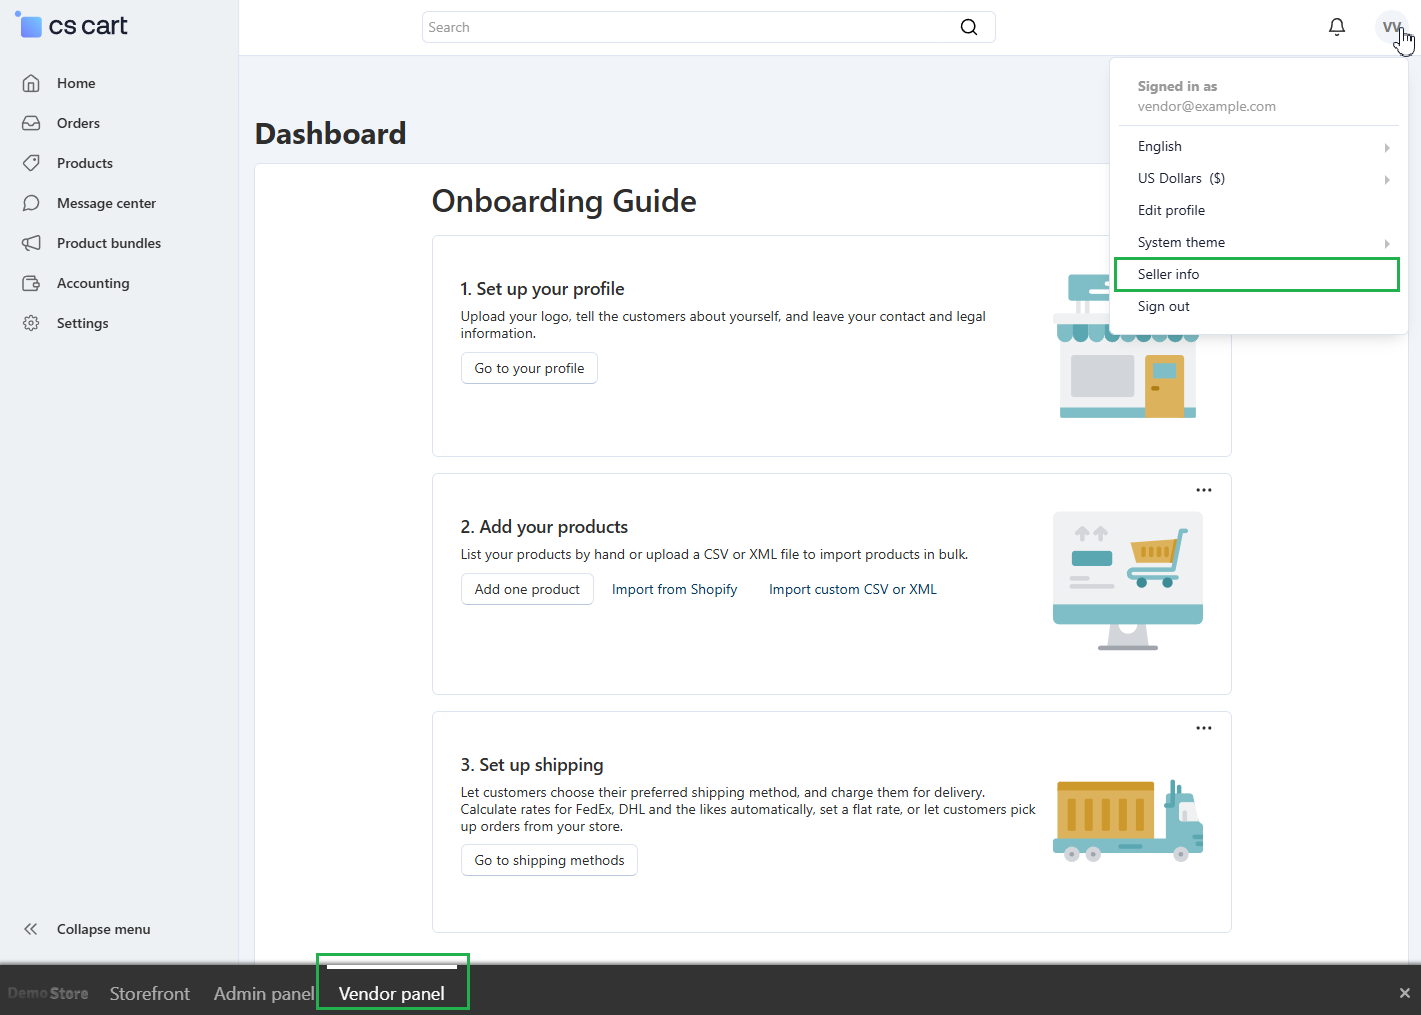
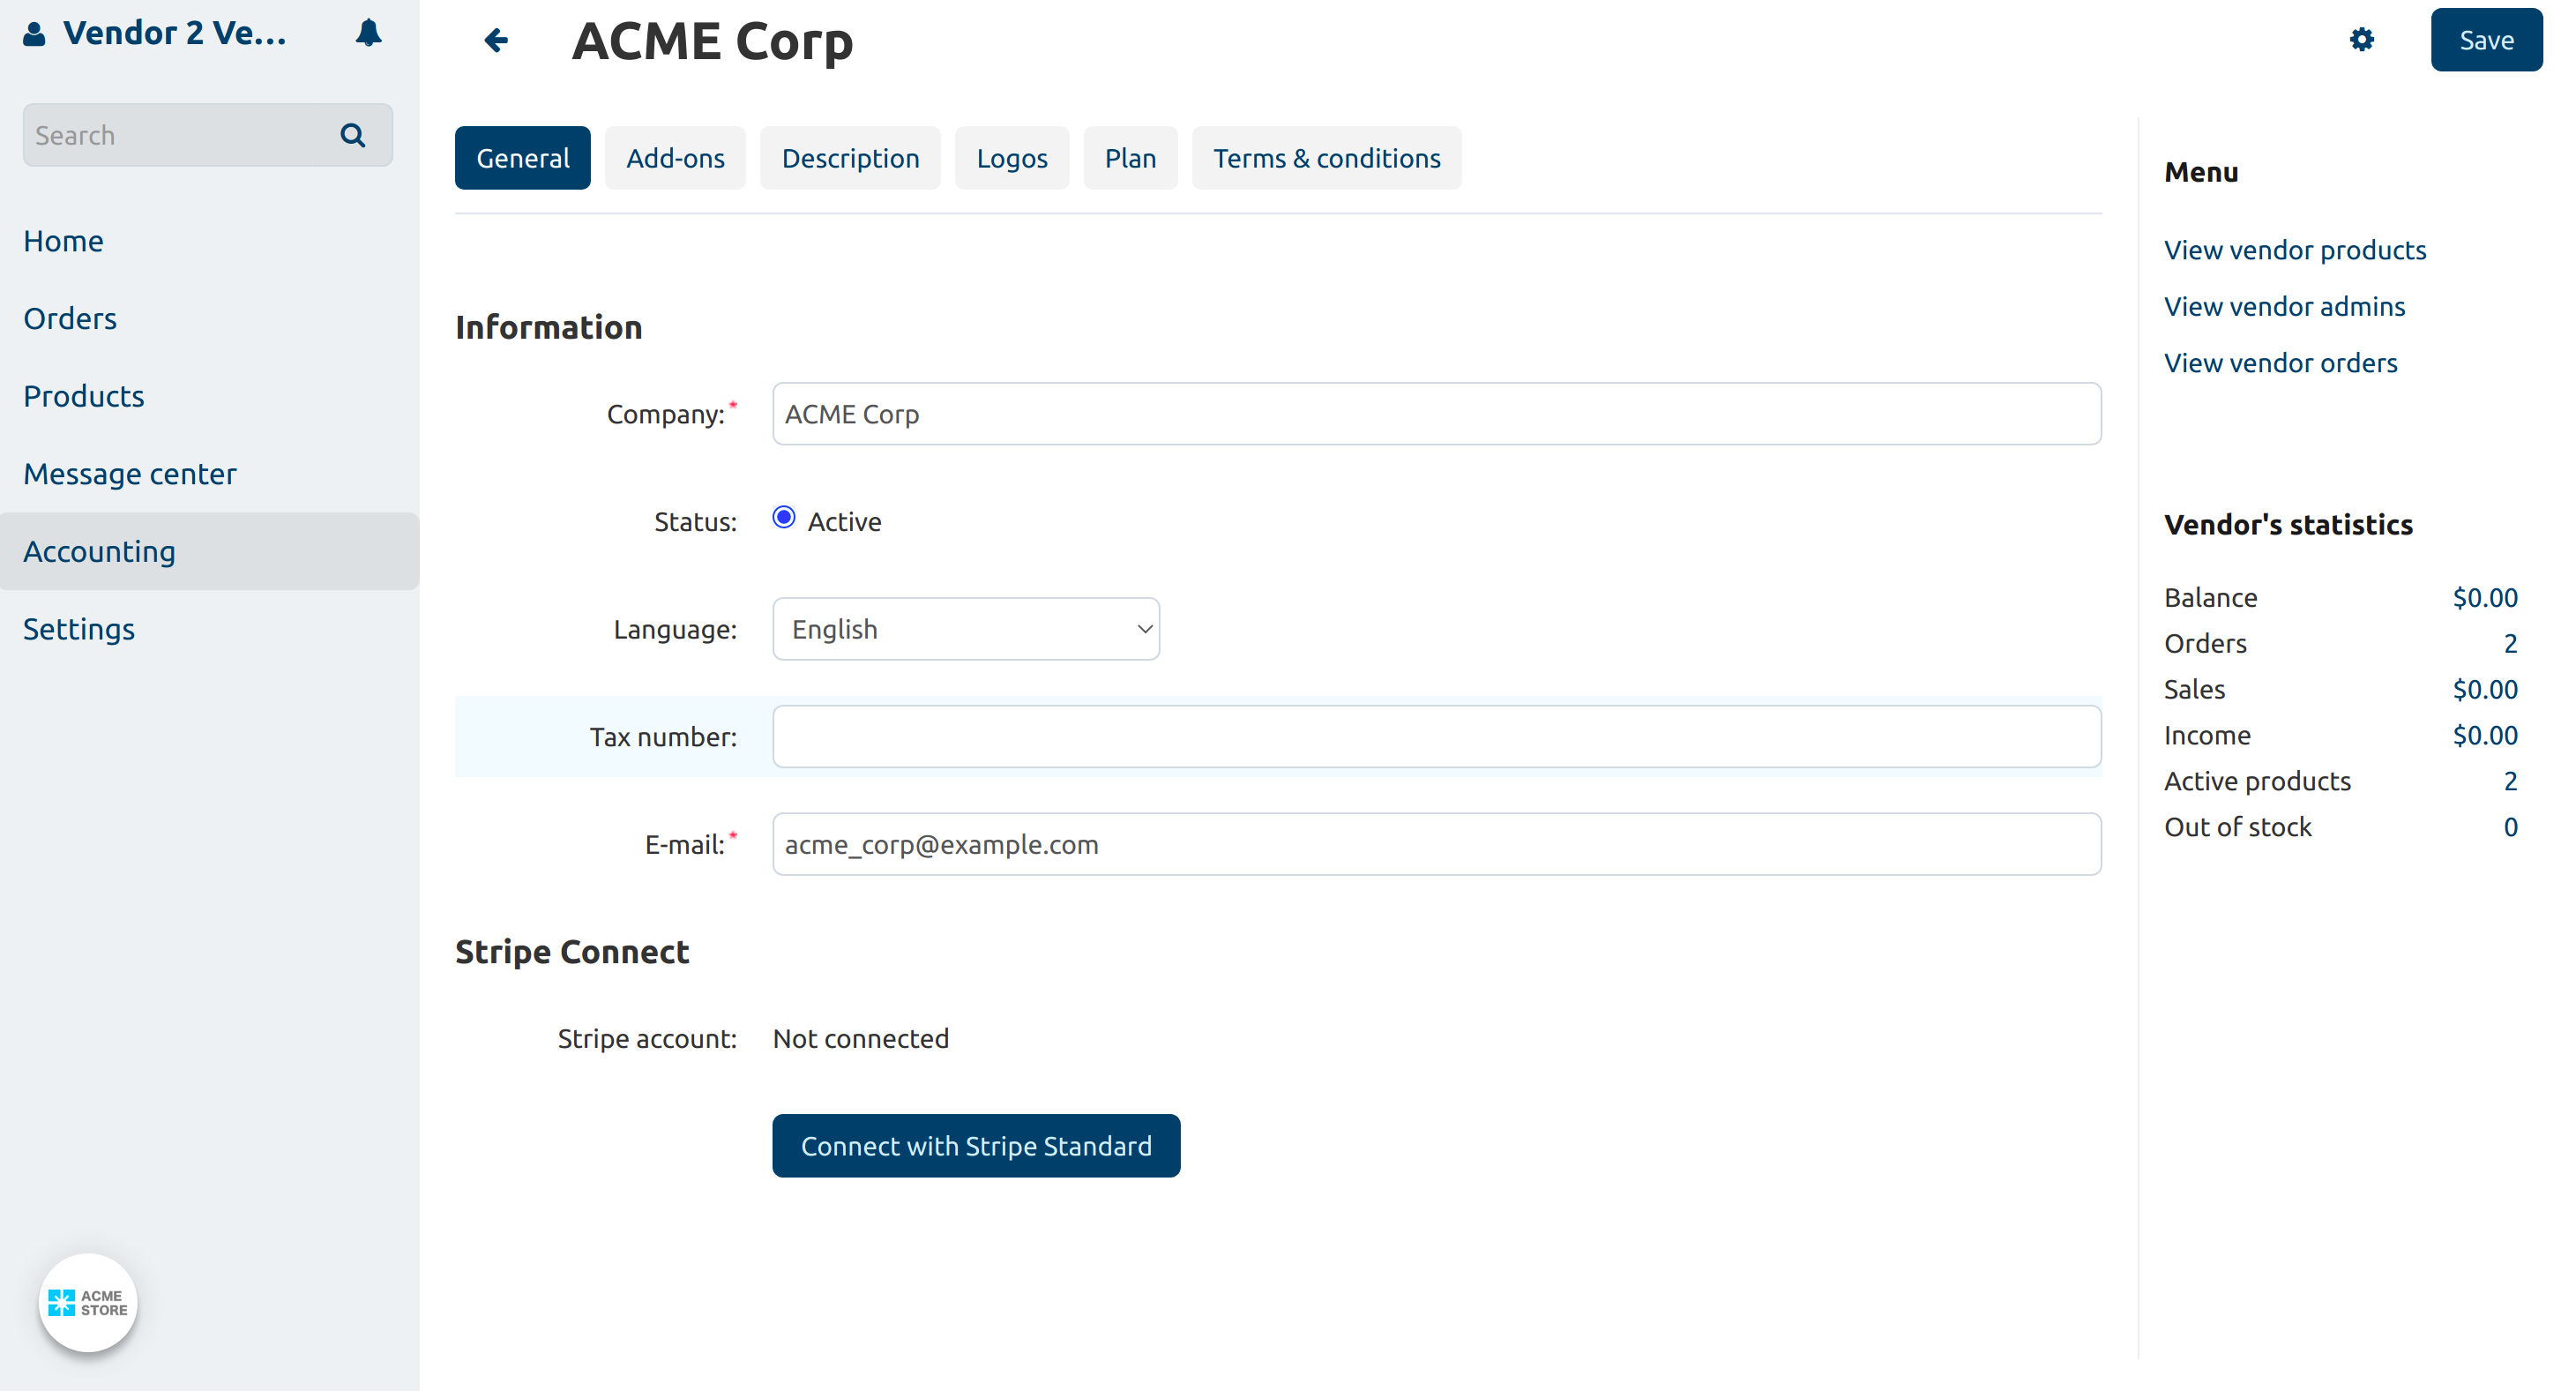
Open the Vendor panel, click your profile icon and select Seller info:
The vendor editing page will open. You will see one of two possible ways to connect with Stripe. Either option will take you to the Stripe page where you can create an account or connect an existing one.
If Express accounts were allowed in Step 1, then you’ll be able to Connect a Stripe Express account. If you already have a Stripe Standard account, click the appropriate button.
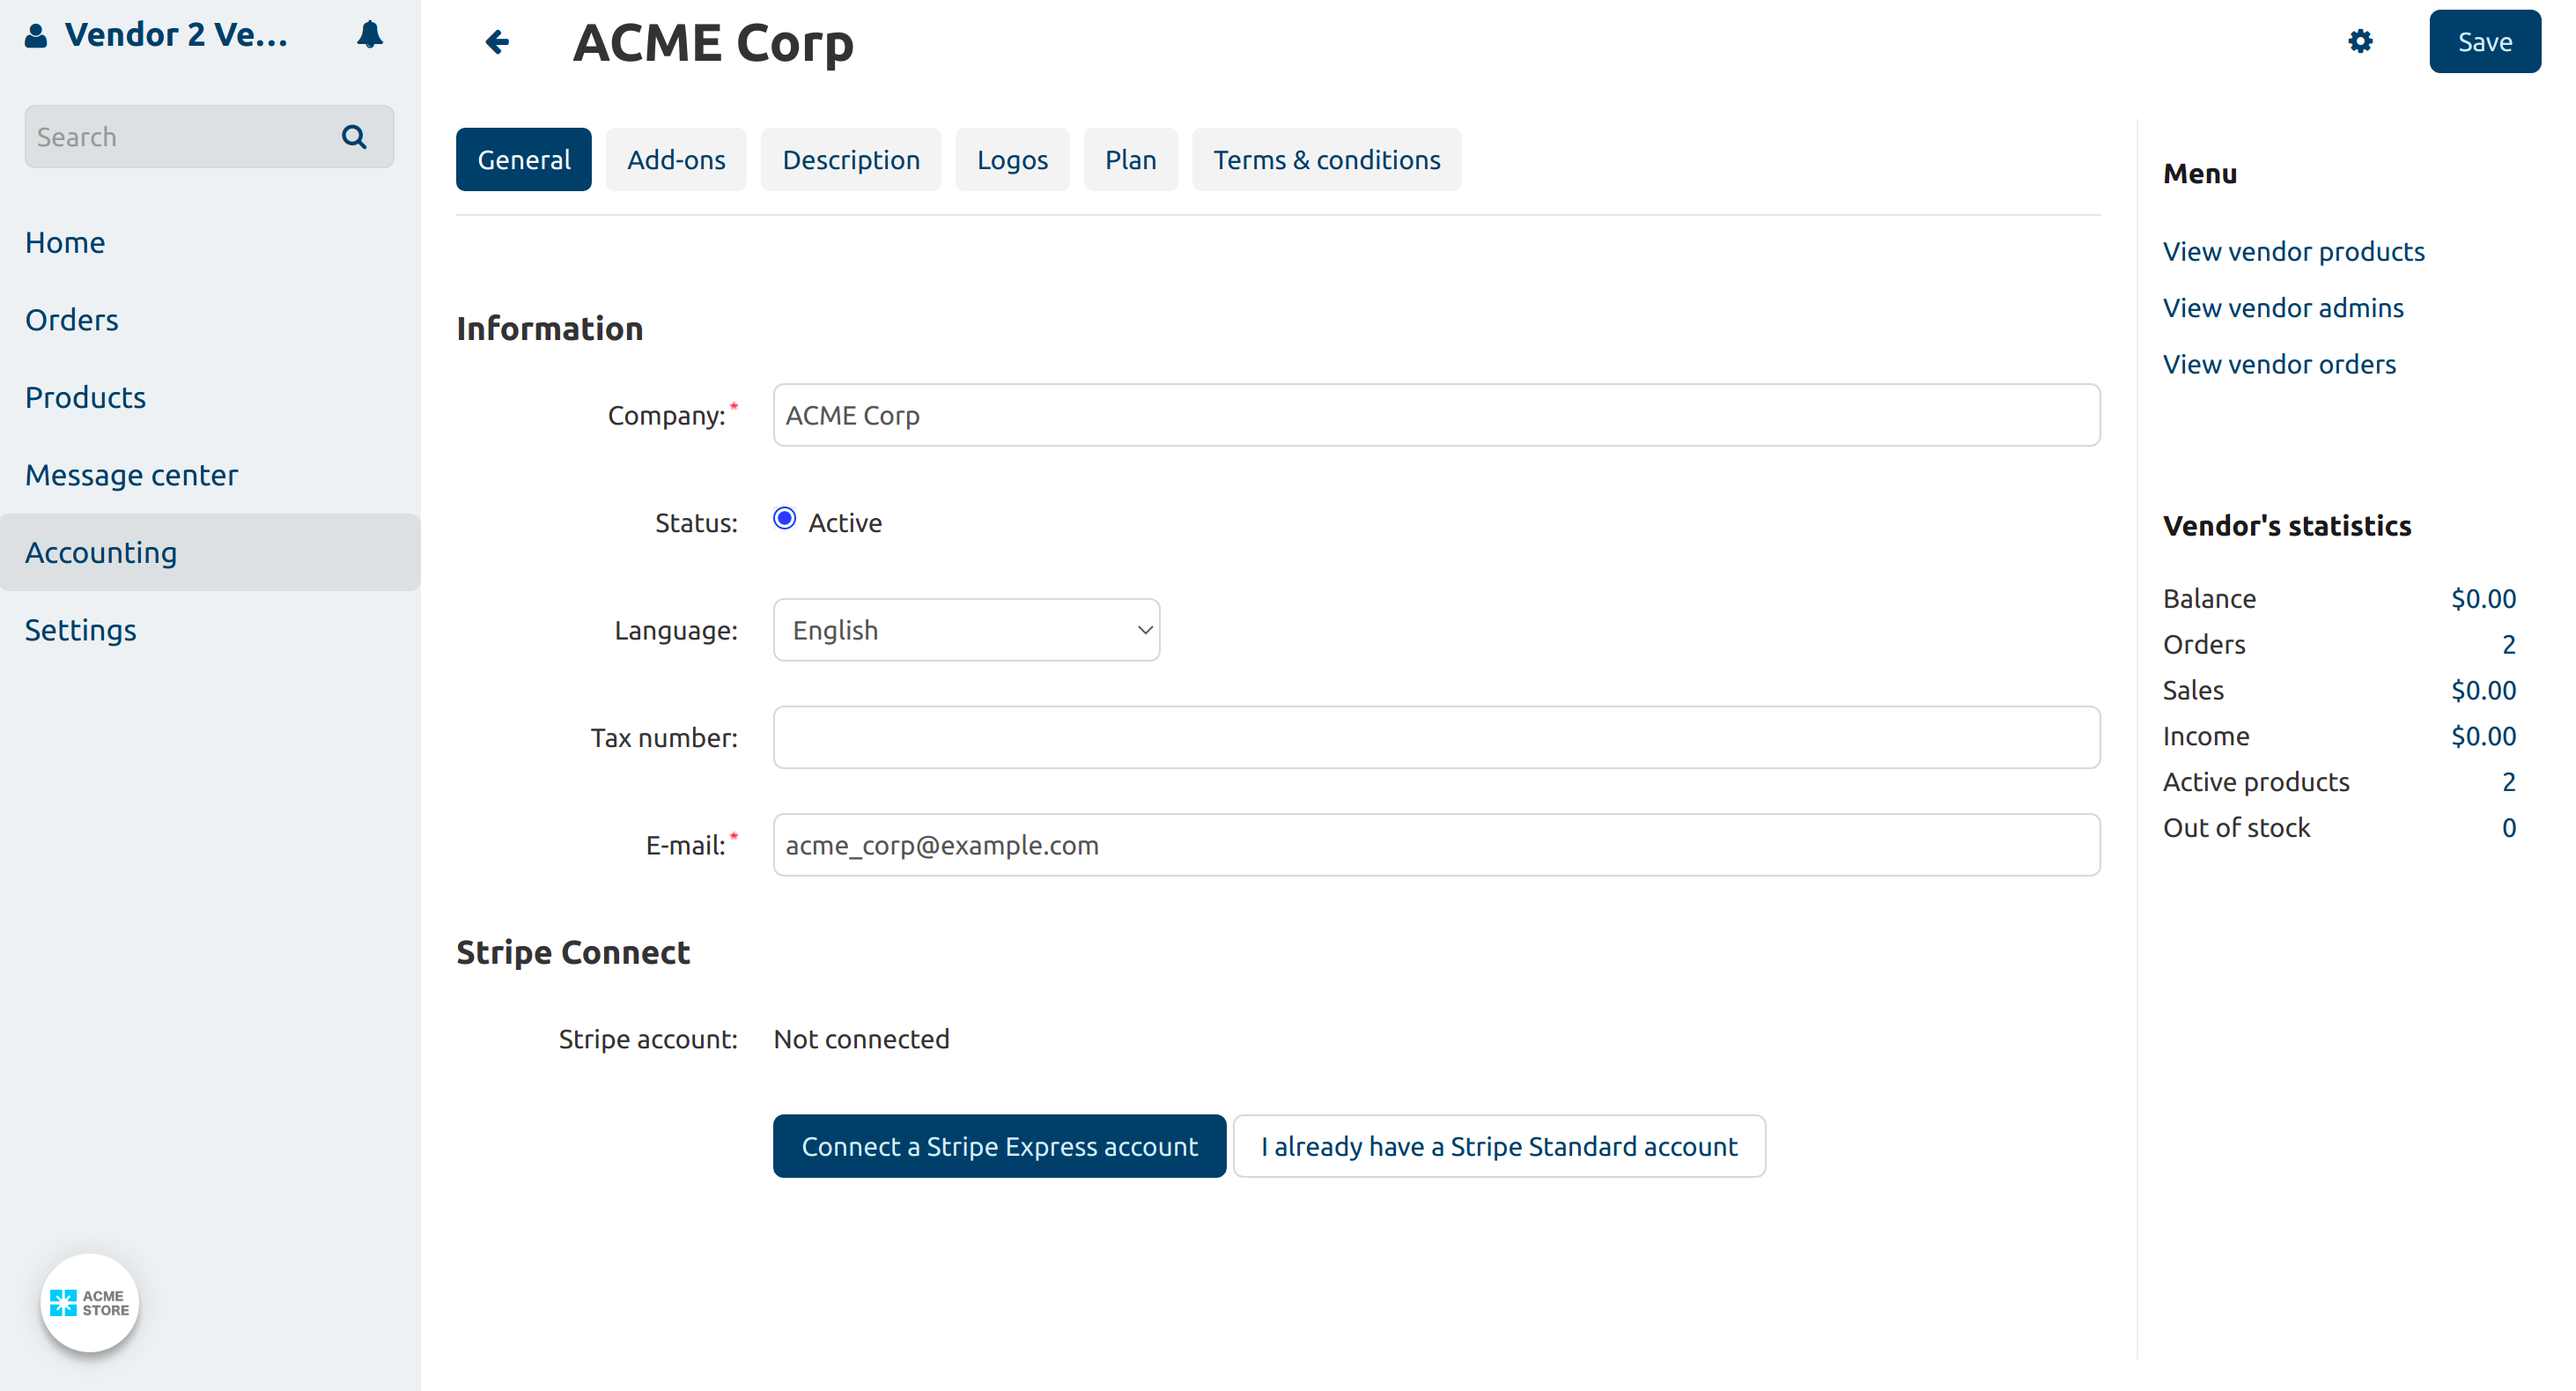
If Express accounts weren’t allowed in Step 1, then you’ll be able to Create Stripe Standard account. If you already have a Stripe Standard account, click the appropriate button.
Questions & Feedback
Have any questions that weren't answered here? Need help with solving a problem in your online store? Want to report a bug in our software? Find out how to contact us.